Spring AI: Streamlining AI Application Development with Java and AI APIs
There is significant excitement worldwide about AI and the development of AI applications. Many individuals aspire to incorporate AI into their organization’s products and reap its benefits. From this prospect, the Spring community built a ‘Spring AI’ module to simplify the AI API integration into the Spring applications. Spring AI is a relatively recent project designed to simplify the integration of AI functionality into Spring applications for developers. It achieves this goal by offering a set of abstractions and tools that streamline interactions with AI models, such as OpenAI and Azure OpenAI.
Spring AI takes inspiration from Python projects like LangChain and LlamaIndex, but it’s specifically designed for the Spring ecosystem. This ensures the utilization of familiar Spring concepts and patterns well-known to Java developers, facilitating a seamless learning curve and adoption.
Prerequisites
- Basic awareness of AI concepts and terminology
- Hands-on with Java and Spring Framework
Let us look at the few concepts that we use when working with spring-ai.
AI Concepts
- Model: AI models are algorithms designed to process and generate information, often mimicking human cognitive functions. By learning patterns and insights from large datasets, these models can make predictions, text, images, or other outputs, enhancing various applications across industries.
- Prompt: Prompts are the queries or inputs that a user or program provides to an AI model to get the desired response from the model. Prompts are what guide the AI model’s output and influence its tone, style, and quality. Prompts can include instructions, questions, or any other type of input, depending on the intended use of the model.
- Prompt Templates: Crafting impactful prompts involves setting the context of the request and replacing elements of the request with values tailored to the user’s input. This process uses traditional text-based template engines for prompt creation and management. Spring AI employs the OSS library, StringTemplate, for this purpose. Ex: `Translate the following English text into Spanish: “{text}`.
- Embeddings: Embeddings transform text into numerical arrays or vectors, enabling AI models to process and interpret language data. This transformation from text to numbers and back is a key element in how AI interacts with and understands human language.
- Tokens: Tokens serve as the building blocks of how an AI model works. On input, models convert words to tokens. On output, they convert tokens back to words. In the context of hosted AI models, your charges are determined by the number of tokens used. Both input and output contribute to the overall token count. Also, models are subject to token limits, which restrict the amount of text processed in a single API call. This threshold is often referred to as the ‘context window’. The model does not process any text that exceeds this limit.
Bring your data to the AI Model
Generally available models might not fit your organization's needs. You need to tune or tailor the model to operate on your data aligned with your organization's goals.
There are two widely used concepts for incorporating your data into AI models.
Fine Tuning: Fine-tuning is the process of adjusting or tailoring a pre-trained model to a specific task or dataset. Instead of training a model from scratch, fine-tuning starts with a model that has already been trained on a large general dataset. Fine-tuning is very efficient when there is limited labeled data available for the target task, as the pre-trained model has already captured general features that can be beneficial for similar tasks.
Fine-tuning can be computationally expensive, especially if the pre-trained model is large and requires substantial resources for re-training.
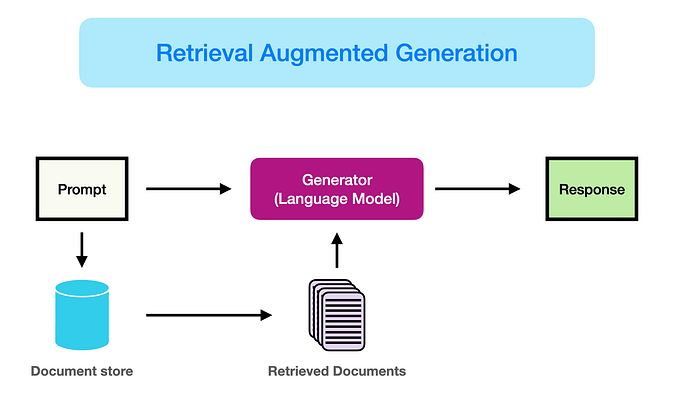
Prompt Stuffing: Prompt stuffing refers to a technique where a large amount of relevant information is directly inserted into the prompt itself. This approach aims to enhance the model’s understanding of the context and guide it towards generating more accurate and relevant responses.
Given a model’s token limits, techniques are required to present relevant data within the model’s context window.
Sample Implementation with Spring-ai
Let us get started with a sample spring boot application that communicates with the open AI model using the open AI provided APIs.
Below are the steps involved:
Step 1: Create a Spring Boot application using Spring Initializer
Step 2: Add the Open AI dependency to your application.
Since Spring AI is in its pre-matured version, you can’t add it to your newly created project using Spring Initializer. you need to explicitly add the snapshot build to experiment with it. Below is the sample gradle file that has the required dependencies.
plugins {
 id 'java'
 id 'org.springframework.boot' version '3.2.1'
 id 'io.spring.dependency-management' version '1.1.4'
}

group = 'com.techmonks'
version = '0.0.1-SNAPSHOT'

java {
 sourceCompatibility = '17'
}

configurations {
 compileOnly {
  extendsFrom annotationProcessor
 }
}

repositories {
 mavenCentral()
 maven {
  url 'https://repo.spring.io/snapshot'
 }
}

dependencies {
 implementation 'org.springframework.boot:spring-boot-starter-actuator'
 implementation 'org.springframework.boot:spring-boot-starter-web'
 implementation 'org.springframework.ai:spring-ai-openai-spring-boot-starter:0.8.0-SNAPSHOT'
 compileOnly 'org.projectlombok:lombok'
 annotationProcessor 'org.projectlombok:lombok'
 testImplementation 'org.springframework.boot:spring-boot-starter-test'
}

tasks.named('test') {
 useJUnitPlatform()
}
If you would like to integrate with Azure Open AI, please include the below dependency.
implementation 'org.springframework.ai:spring-ai-azure-openai-spring-boot-starter:0.8.0-SNAPSHOT'Step 3: Include your open AI key
Add your open AI API key to your yml configuration. you can create the open ai API key here: https://platform.openai.com/api-keys
spring:
  ai:
    openai:
      api-key: {open AI API key goes here}
We are ready with the required configurations. Let's create a controller to build REST APIs.
Step 4: Create a REST controller and initialize the ChatClient from Spring ai.
In the below example, we are using the prompt template to translate the text from one language to another by using open AI APIs.
Spring AI exposes ChatClient, which abstracts the logic that is required to interact with open AI APIs. ChatClient is a functional interface that streamlines interaction with AI models. It facilitates connections to various AI models. Currently, the interface exclusively supports text input and output, but additional types can be anticipated in future updates.
package com.techmonks.openai.controller;

import com.techmonks.openai.model.TranslationModel;
import lombok.RequiredArgsConstructor;
import org.springframework.ai.chat.ChatClient;
import org.springframework.ai.chat.ChatResponse;
import org.springframework.ai.prompt.PromptTemplate;
import org.springframework.http.ResponseEntity;
import org.springframework.web.bind.annotation.*;

@RequiredArgsConstructor
@RestController
@RequestMapping("v1")
public class OpenAiController {
    private final ChatClient chatClient;

    @PostMapping("translations")
    public ResponseEntity<String> translate(@RequestBody TranslationModel translationModel) {
        PromptTemplate promptTemplate = new PromptTemplate("""
                Translate the following {fromLanguage} text to {toLanguage}: {textToTranslate}""");
        promptTemplate.add("fromLanguage", translationModel.getTranslateFrom());
        promptTemplate.add("toLanguage", translationModel.getTranslateTo());
        promptTemplate.add("textToTranslate", translationModel.getTextToTranslate());

        ChatResponse chatResponse = this.chatClient.generate(promptTemplate.create());
        return ResponseEntity.ok(chatResponse.getGeneration().getContent());
    }

}
The above REST API code returns the response in string format. Let’s modify the logic to return the response in JSON format.
package com.techmonks.openai.controller;

import com.techmonks.openai.model.TranslationModel;
import com.techmonks.openai.model.TranslationResponse;
import lombok.RequiredArgsConstructor;
import org.springframework.ai.chat.ChatClient;
import org.springframework.ai.chat.ChatResponse;
import org.springframework.ai.parser.BeanOutputParser;
import org.springframework.ai.prompt.PromptTemplate;
import org.springframework.http.ResponseEntity;
import org.springframework.web.bind.annotation.*;

@RequiredArgsConstructor
@RestController
@RequestMapping("v1")
public class OpenAiController {
    private final ChatClient chatClient;

    @PostMapping("translations")
    public ResponseEntity<TranslationResponse> translate(@RequestBody TranslationModel translationModel) {
        BeanOutputParser<TranslationResponse> beanOutputParser = new BeanOutputParser<>(TranslationResponse.class);
        PromptTemplate promptTemplate = new PromptTemplate("""
                Translate the following {fromLanguage} text to {toLanguage}: {textToTranslate} {format}""");
        promptTemplate.add("fromLanguage", translationModel.getTranslateFrom());
        promptTemplate.add("toLanguage", translationModel.getTranslateTo());
        promptTemplate.add("textToTranslate", translationModel.getTextToTranslate());

        promptTemplate.add("format", beanOutputParser.getFormat());
        promptTemplate.setOutputParser(beanOutputParser);

        ChatResponse chatResponse = this.chatClient.generate(promptTemplate.create());
        return ResponseEntity.ok(beanOutputParser.parse(chatResponse.getGeneration().getContent()));
    }

}
Below is a sample Postman collection to verify the REST APIs.
{
 "info": {
  "_postman_id": "b3f73dc4-7eaf-4065-8b4c-5b28b469d744",
  "name": "open-ai",
  "schema": "https://schema.getpostman.com/json/collection/v2.1.0/collection.json",
  "_exporter_id": "3152420",
  "_collection_link": "https://releasedashboard.postman.co/workspace/Anji~01fb9b44-0970-46dd-9195-56044a7ead66/collection/3152420-b3f73dc4-7eaf-4065-8b4c-5b28b469d744?action=share&source=collection_link&creator=3152420"
 },
 "item": [
  {
   "name": "translate-text",
   "request": {
    "method": "POST",
    "header": [],
    "body": {
     "mode": "raw",
     "raw": "{\r\n    \"translateFrom\":\"English\",\r\n    \"translateTo\":\"Hindi\",\r\n    \"textToTranslate\":\"Hello, How are you doing today?\"\r\n}",
     "options": {
      "raw": {
       "language": "json"
      }
     }
    },
    "url": {
     "raw": "http://localhost:8080/v1/translations",
     "protocol": "http",
     "host": [
      "localhost"
     ],
     "port": "8080",
     "path": [
      "v1",
      "translations"
     ]
    }
   },
   "response": []
  }
 ]
}
As always, you can find the entire source code here.
That’s all for today!
Thank you for taking the time to read this article. I hope you have enjoyed it. If you enjoyed it and would like to stay updated on various technology topics, please consider following and subscribing for more insightful content.
References: