Distributed cloud-native architecture has become the default standard for enterprise applications. In distributed architectures, communication with other systems or applications to fulfill the user request is inevitable. When systems communicate over the network, there are high chances of failures within the system. These failures can be triggered by network issues or dependent components not responding due to other issues.
In this article, we would like to go over chaos engineering, its principles, and how we can integrate Chaos Monkey into a Spring Boot application.
What is Choas Engineering?
Chaos engineering is the discipline of experimenting with the system by injecting controlled, real-world failures to build confidence in the system's capability to withstand turbulent conditions in production. The primary goal is to identify and address potential issues before they occur in actual production environments.
Why do we need Choas Engineering?
Before the rise of the cloud and microservices, all the applications were hosted within the company’s network. Applications are monolithic (three-tier applications), and there is a very minimal need to communicate with external systems. Application downtimes that impact application availability are very well planned.
The web has grown incredibly complex with the rise of distributed cloud architectures and microservices. It has become inevitable to rely on apps and other external components. With this, it becomes incredibly hard to predict failures. These failures can disrupt your application's availability, leaving a very bad customer experience.
Chaos engineering is a proactive approach that contributes to the development of resilient, reliable systems, ultimately enhancing the user experience and minimizing the impact of unexpected failures. It enables you to proactively identify and resolve the issues by simulating real-world scenarios, which improves the reliability and resiliency of the system.
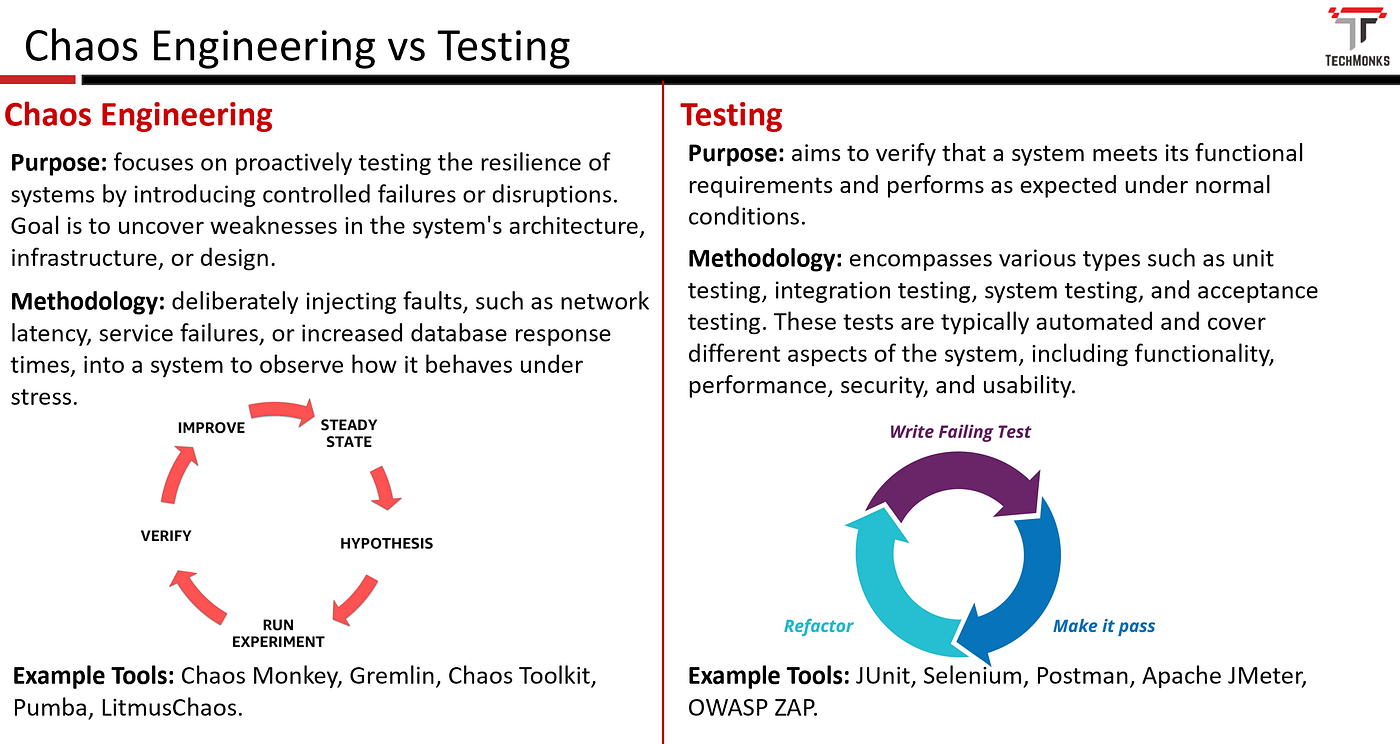
Chaos Engineering vs Testing
Chaos Engineering and Testing are related practices, but they serve different purposes and have distinct approaches. The below image provides a detailed comparison.
Key Aspects of Chaos Engineering
- Hypothesis-driven Experiments: formulating hypotheses about how a system might fail and designing experiments to test those hypotheses.
- Controlled Failure Injection: Introducing controlled and limited disruptions, such as network latency, service outages, or increased database response times, into the system.
- Monitoring and Analysis: Implementing robust monitoring to observe the behavior of the system during chaos experiments. Analyzing metrics, logs, and traces to identify weaknesses.
- Learning and Improvement: Documenting findings and using the insights gained to improve system resilience, enhance recovery mechanisms, and strengthen overall reliability.
- Automation: Integrating chaos testing into automated testing processes, including continuous integration/continuous deployment (CI/CD) pipelines, to ensure ongoing validation of system behavior.
By intentionally causing controlled disruptions, chaos engineering helps teams uncover hidden vulnerabilities and weaknesses in distributed systems, microservice architectures, and other complex infrastructures. This proactive approach allows organizations to build more resilient and reliable systems that can better withstand unexpected failures in real-world scenarios.
What is a Chaos Monkey?
Chaos Monkey is a tool developed by Netflix as part of its broader chaos engineering initiative. It is designed to test the resiliency of applications and infrastructure by deliberately causing failures in a controlled manner. The primary purpose of Chaos Monkey is to ensure that systems are built to handle failures gracefully without significantly impacting the user experience.
Adding Chaos Monkey in Spring Boot
Let us look into detailed steps that outline how to add Chaos Monkey to the Spring Boot application.
Step 1: Create your spring boot application from the spring initializer.
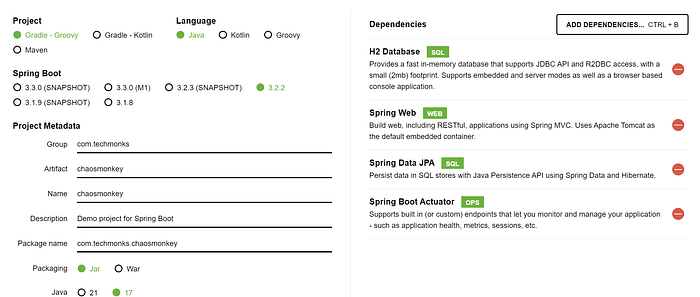
Step 2: Open the project in your favorite IDE and add the below dependency.
implementation 'de.codecentric:chaos-monkey-spring-boot:3.1.0'Step 3: Add a ‘chaos-monkey’ profile to your application's active profiles list. With the ‘chaos-monkey’ profile, the required logic will get automatically injected into your application. Below is the minimal configuration to enable latency assaults at your service classes.
spring:
  profiles:
    active:
      - chaos-monkey

chaos:
  monkey:
    enabled: true
    watcher:
      service: true
    assaults:
      latencyActive: true
With the above configuration, we are enabling service watchers that inject additional latency when you are accessing your service classes.
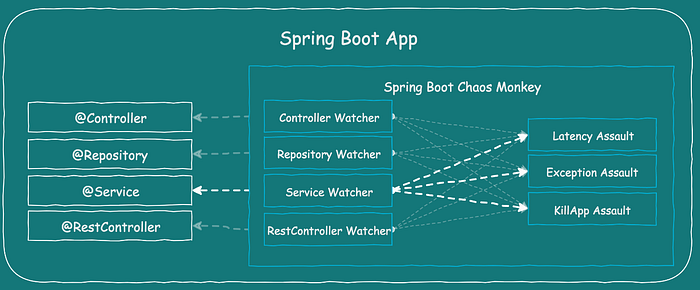
Below is a high-level view of how Chaos Monkey works in the Spring Boot application.
The below configurations enable Chaos Monkey Swagger documentation as part of your application.
spring:
  profiles:
    active:
      - chaos-monkey

management:
  endpoint:
    chaosmonkey:
      enabled: true
  endpoints:
    web:
      exposure:
        include: health,info,chaosmonkey

springdoc:
  show-actuator: true
  api-docs:
    enabled: true
  swagger-ui:
    enabled: true

chaos:
  monkey:
    enabled: true
    apidoc:
      enabled: true
    watcher:
      service: true
    assaults:
      latencyActive: true
Before exploring the Chaos Monkey APIs, let us understand the terminology of the Chaos Monkey.
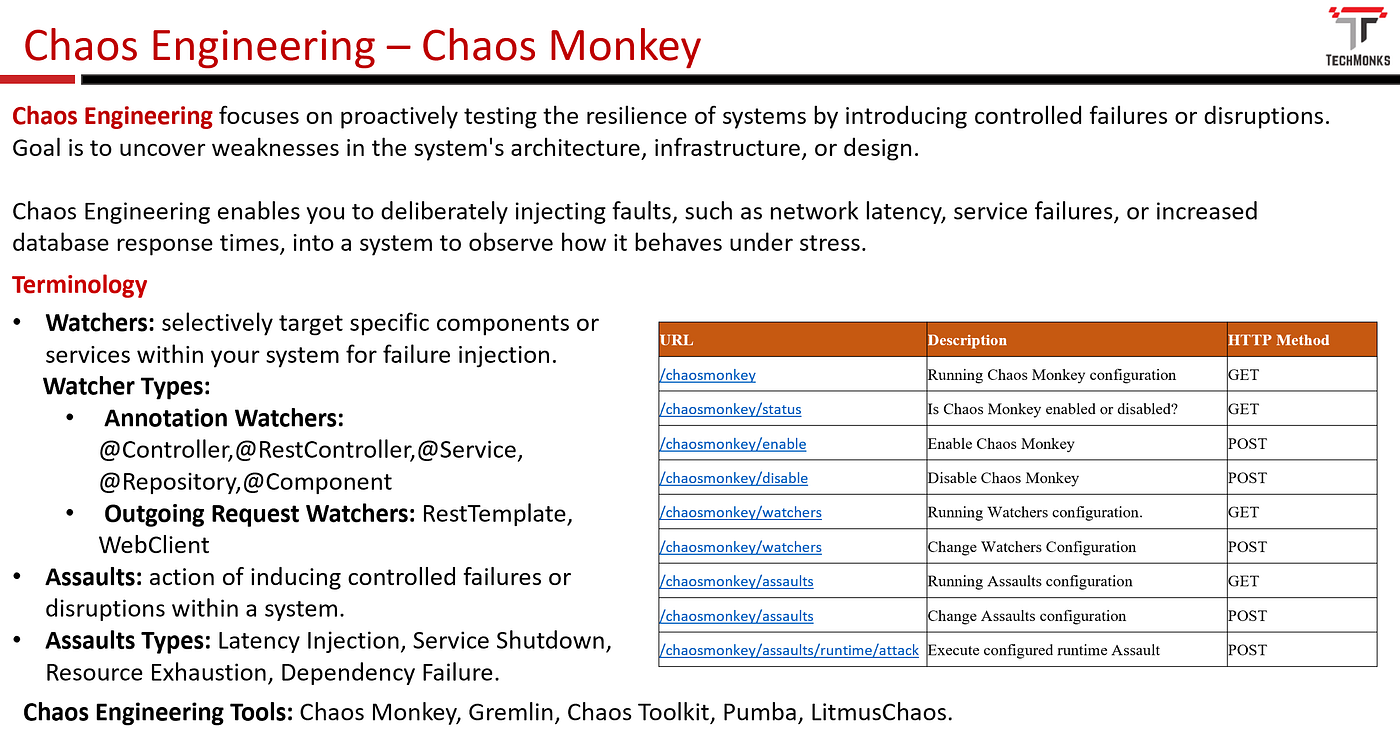
Watcher
The watcher component in Chaos Monkey helps selectively target specific components or services within your system for failure injection. The watcher observes the application’s runtime environment and identifies the components that Chaos Monkey should interact with while conducting the experiments.
Watcher Types:
Annotation Watchers:
- @Controller
- @RestController
- @Service
- @Repository
- @Component
Outgoing Request Watchers:
- RestTemplate
- WebClient
Please note that RestTemplates and WebClients that are not created as beans via new RestTemplate() and WebClient.create() are not getting instrumented. This is because these watchers don’t use AOP. Instead, they inject their respective customizers.
Assaults
In Chaos Monkey, “assault” refers to the action of inducing controlled failures or disruptions within a system.
The assault component in Chaos Monkey is responsible for simulating real-world failures and disruptions within a system. By intentionally introducing faults, Chaos Monkey can test the resilience of the system and validate its ability to withstand unexpected events.
Types of Assaults
Chaos Monkey can execute various types of assaults, including:
- Latency Injection: Introducing artificial delays or latency into network requests or service calls.
- Service Shutdown: temporarily shutting down or disabling specific services or components.
- Resource Exhaustion: Simulating resource exhaustion by consuming excessive CPU, memory, or disk space.
- Dependency Failure: Injecting failures or disruptions in dependencies or external services.
Sample configuration
chaos:
  monkey:
    enabled: true
    watcher:
      service: true
    assaults:
      latencyActive: true
      latencyRangeStart: 2000
      latencyRangeEnd: 5000
The above configuration injects 2–5 seconds of latency into service components while processing the request.
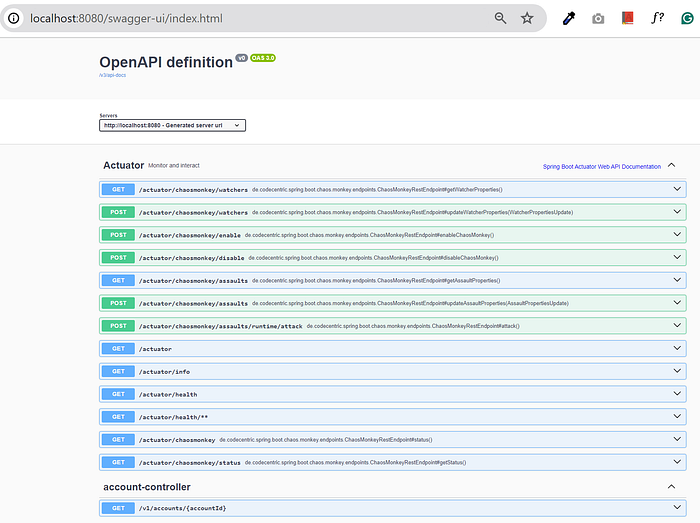
Chaos Monkey offers various endpoints to simulate experiments while running the application. When you run your application with the above-mentioned configuration, you should be able to see Choas monkey endpoints as points of your swagger URL as shown below.
Below are the key Chaos Monkey endpoints.
+--------------------------------------+--------------------------------------+-------------+
|                 URL                  |             Description              | HTTP Method |
+--------------------------------------+--------------------------------------+-------------+
| /chaosmonkey                         | Running Chaos Monkey configuration   | GET         |
| /chaosmonkey/status                  | Is Chaos Monkey enabled or disabled? | GET         |
| /chaosmonkey/enable                  | Enable Chaos Monkey                  | POST        |
| /chaosmonkey/disable                 | Disable Chaos Monkey                 | POST        |
| /chaosmonkey/watchers                | Running Watchers configuration.      | GET         |
| /chaosmonkey/watchers                | Change Watchers Configuration        | POST        |
| /chaosmonkey/assaults                | Running Assaults configuration       | GET         |
| /chaosmonkey/assaults                | Change Assaults configuration        | POST        |
| /chaosmonkey/assaults/runtime/attack | Execute configured runtime Assault   | POST        |
+--------------------------------------+--------------------------------------+-------------+
Now, let us look into how we can add additional latency to service annotated classes.
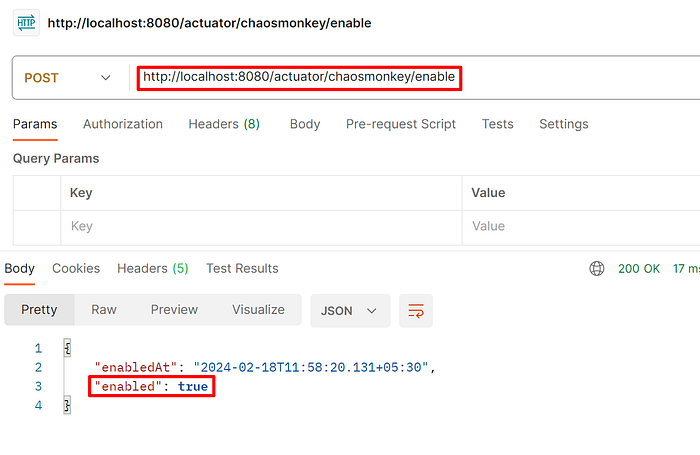
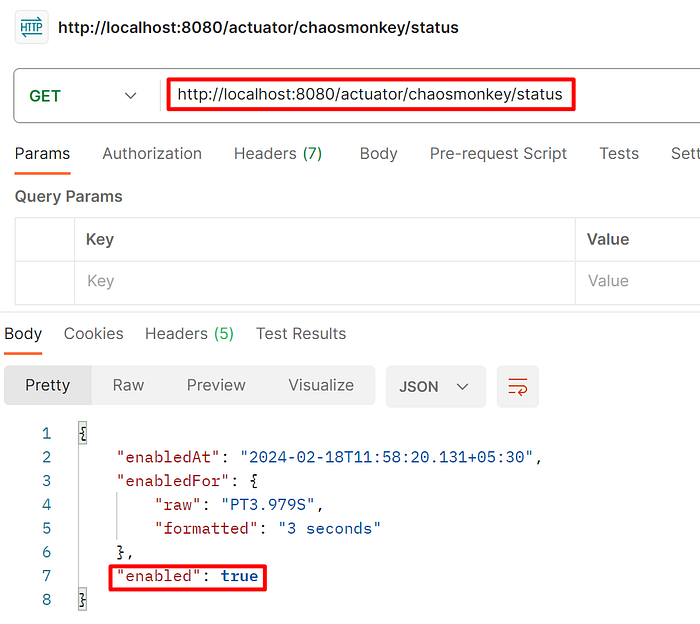
Step 1: Enable the Choas Monkey through APIs if it is not already enabled.
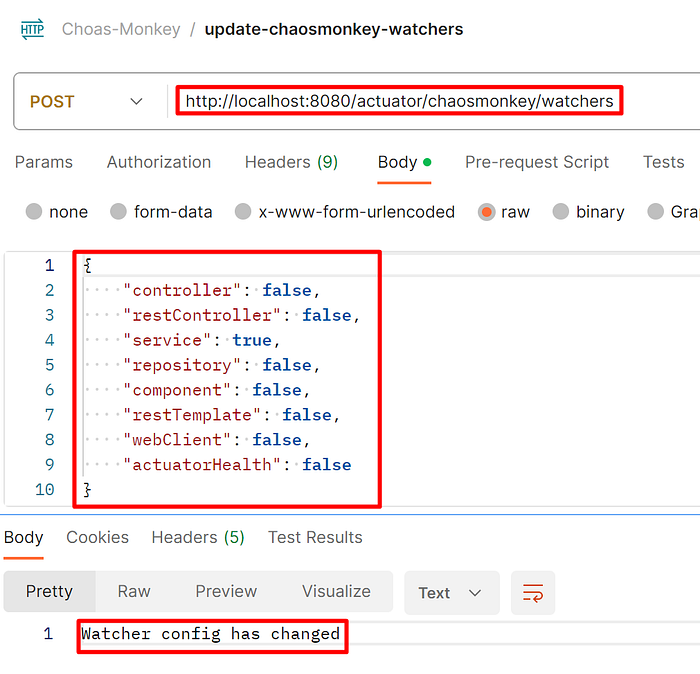
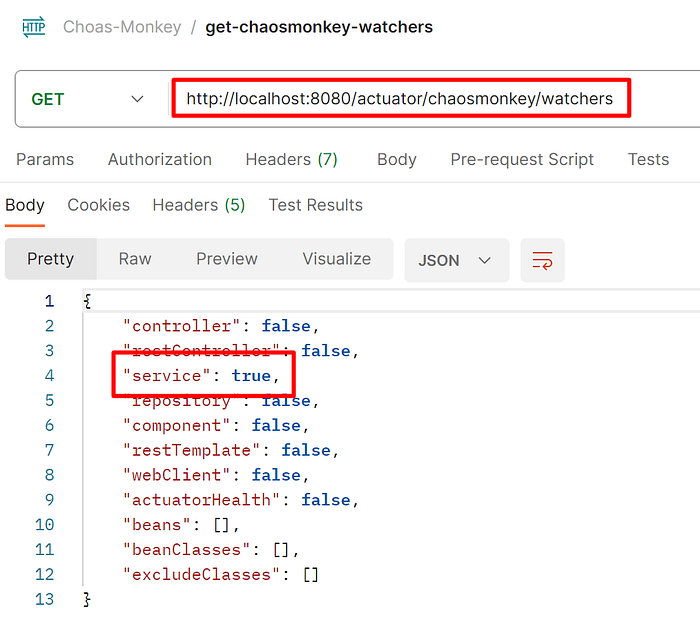
Step 2: Enable the watcher on the service component.
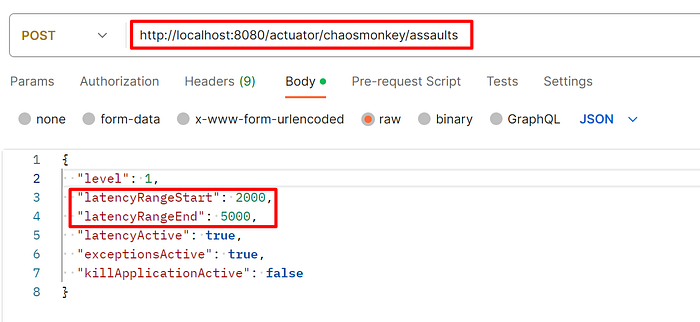
Step 3: Enable Latency assault
Step 4: Validate the endpoint
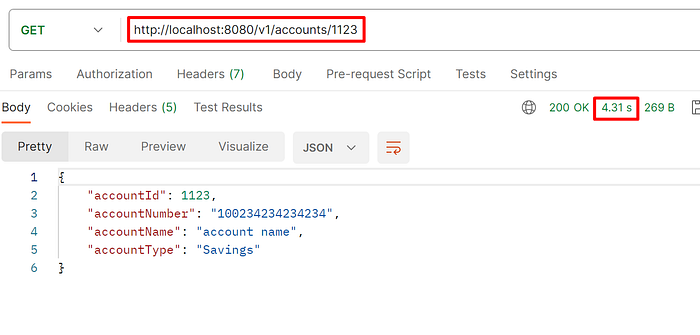
Now, you can see that additional latency is enabled when accessing the endpoint. Similarly, you can induce various assaults and validate the resilience of your system.
As always, you can find the entire source code here.
That’s all for today!
Thank you for taking the time to read this article. I hope you have enjoyed it. If you enjoyed it and would like to stay updated on various technology topics, please consider following and subscribing for more insightful content.
References: